
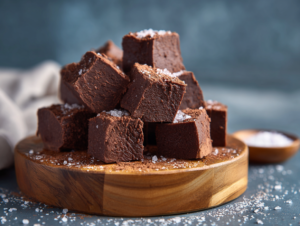
Classic Hershey’s Cocoa Fudge Recipe for Rich Chocolate Lovers
Why You’ll Love This Recipe
If you’re someone who believes that chocolate makes everything better, you’re in for a real treat. This Classic Hershey’s Cocoa Fudge Recipe takes you back to the good ol’ days when simple ingredients created the most decadent desserts. With its velvety smooth texture, rich chocolate taste, and irresistible sweetness, this old-fashioned fudge ticks all the right boxes.
You’ll love this recipe because:
- It’s made with pantry staples—no fancy ingredients required!
- Delivers rich, deep cocoa flavor thanks to Hershey’s Cocoa Powder.
- Perfect for gifting and gatherings; holidays, potlucks, or just because.
- Old-school charm meets modern ease.
- No need for candy thermometers if you follow our tips carefully.
Ever bitten into a piece of fudge so smooth and intensely chocolaty that it almost melts before you chew? That’s this dessert.
Essential Tools and Equipment
Before you dive in, gather these kitchen essentials. Having the right tools makes the process smoother and your fudge flawless.
- Heavy-bottomed saucepan (around 2 quarts)
- Wooden spoon or heatproof silicone spatula
- Candy thermometer (optional but helpful for monitoring stages)
- 8×8-inch square baking dish or pan
- Wax paper or parchment paper
- Butter knife or offset spatula for smoothing out the top
- Measuring cups and spoons
Tip: A heavy-bottomed saucepan helps distribute heat evenly, which is crucial to avoid scorching the sugar or cocoa.
Preparation Tips
Here’s where a little prep goes a long way. Make your fudge-making experience easy and successful with these simple tips:
- Read the recipe all the way through before starting—timing is key in fudge making.
- Pre-butter your baking dish and line it with parchment or waxed paper. It’ll come out easily after setting.
- Don’t stir once the mixture starts to boil. Stirring at the wrong time crystallizes the sugar.
- Use a candy thermometer to check when the mixture hits 234°F (soft-ball stage). If not using one, use the cold water test (more on that later).
- Butter the sides of your saucepan before heating. This helps reduce sugar crystals from forming.
- Use a damp cloth to clean the pan’s sides during boiling to avoid crystallization.
Fudge is somewhat of a science project—just the tastiest one you’ll ever do!
Ingredients List
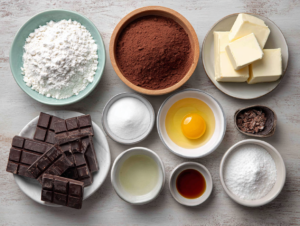
Here’s what you need to make about 16 (or more) squares of rich, creamy Hershey’s cocoa fudge:
- 3 cups granulated sugar
- ⅔ cup Hershey’s cocoa powder (unsweetened)
- ⅛ teaspoon salt
- 1½ cups whole milk
- ¼ cup unsalted butter (plus more for greasing)
- 1 teaspoon vanilla extract (pure or homemade preferred)
Note: Avoid using low-fat milk—it changes the texture and thickness of the final product.
Step-by-Step Directions
Let’s walk through each step of this classic Hershey’s cocoa fudge recipe. Old-fashioned doesn’t mean complicated—just precise.
- Line an 8×8-inch pan with wax paper and butter it generously. Set aside.
- In a heavy 2-quart saucepan, combine sugar, cocoa powder, and salt. Stir to mix evenly.
- Gradually add the milk, stirring constantly until the mixture is smooth and lump-free.
- Place the saucepan over medium heat. Stir consistently until the sugar dissolves completely and mixture starts to boil.
- Once it starts boiling, stop stirring! Let it cook without stirring until it reaches 234°F on a candy thermometer or until a small drop forms a soft ball in cold water.
- Remove from heat. Drop in butter and vanilla, but do not stir yet. Let it cool to around 110°F (feels warm to the touch but not hot).
- Once slightly cooled, beat the mixture vigorously with a wooden spoon until it thickens, loses its gloss, and starts to set. This takes muscle—get a helper if needed!
- Quickly pour the mixture into your prepared pan. Spread evenly.
- Let it cool completely until firm (about 1–2 hours at room temperature).
- Lift fudge out using parchment paper. Cut into squares and enjoy!
Common Mistakes to Avoid
Even seasoned bakers can struggle with fudge. Let’s dodge those pitfalls together.
- Overboiling or underboiling: Use the soft ball stage (234°F) as your guide. Too hot and the fudge turns crumbly, too cold and it’s gooey.
- Stirring during boiling: This is a big no-no. It causes sugar crystals to form, leading to gritty fudge.
- Skipping the cooling phase before beating: If you beat too early, the fudge may not set properly and will be sticky.
- Not sealing the edges of your pan: Fudge sticks if you skip the butter or parchment.
Remember: patience is your best friend here.
Best Side Dishes
While fudge is a sweet treat best served alone, it pairs wonderfully with:
- Fresh strawberries or raspberries – Their tartness balances the fudge’s richness.
- Vanilla bean ice cream – A creamy scoop next to a cube of fudge? Yes, please.
- Espresso or dark coffee – The bold flavors deepen the chocolate experience.
- Pecans or walnuts – Serve fudge with a nutty platter for extra texture.
Expert Recipe Tips
Want to take this classic fudge to the next level? Try these expert upgrades.
- For nut lovers: Stir in ½ cup of chopped pecans or walnuts before pouring into the pan.
- Add a twist of sea salt – sprinkle flaky salt on top before it sets for a gourmet touch.
- Swirl in peanut butter – drop teaspoons on top and use a knife to swirl before setting.
- No vanilla? Try almond extract or a splash of Irish cream liqueur for a festive flair.
- Use a stand mixer with a paddle attachment to beat the fudge, if you have one.
Storage and Reheating Instructions
Fudge is one of those desserts that stores beautifully.
- At room temperature: Store in an airtight container for up to 1 week. Separate layers with wax paper.
- In the fridge: It lasts about 2–3 weeks, though the texture may firm up slightly.
- Freezer-friendly: Wrap tightly in plastic wrap, then foil. Freeze up to 3 months.
To enjoy frozen fudge, let it thaw in the fridge overnight or at room temp for a few hours. Reheating isn’t really needed, but if you want it slightly melty over ice cream, a quick 5-second zap in the microwave does the trick.
Frequently Asked Questions (FAQs)
Can I use Dutch-process cocoa instead of Hershey’s cocoa?
Hershey’s cocoa is natural and acidic, which works with the sugar and milk balance here. Dutch-process is milder and may change the flavor. Stick with the original for best results.
What’s the soft-ball stage, and how do I check it without a thermometer?
It’s when a drop of hot fudge syrup, dropped into cold water, forms a soft, squishy ball. It should hold its shape but remain flexible.
Can I add mix-ins like marshmallows or chocolate chips?
Absolutely! Add them after beating, just before pouring into the pan. Make sure extras don’t melt completely unless you want a swirl effect.
Why is my fudge grainy or dry?
It’s likely due to premature stirring during boiling or not reaching the correct temperature. Always wait to stir until cooling, and use a thermometer if possible.
Can I double this recipe?
Yes, but use a larger pan and a deeper saucepan. Doubling fudge increases the risk of overcooking, so monitor temperature carefully.
Final Thoughts
There’s a reason this Classic Hershey’s Cocoa Fudge Recipe has stood the test of time—it just works. From its dreamy consistency to its nostalgic flavor, it’s a dessert that sparks joy in every bite. Whether you’re making it for a holiday tray, gifting neighbors, or treating yourself on a chocolate-craving kind of day, this recipe never disappoints.
So grab your Hershey’s cocoa and let’s bring a little old-fashioned magic back to the kitchen. And hey, if you try this recipe and love it (which we know you will), don’t forget to share your results in the comments—or better yet, snap a photo and tag us!
Happy fudge-making, chocolate lovers! 🍫
—
Looking for more classic dessert recipes? Check out our guides to:
Stay sweet!
Usually I do not read post on blogs, but I wish
to say that this write-up very forced me to check
out and do it! Your writing style has been amazed me. Thanks, quite nice post.
Here is my web page youtube downloader online — y2mate
감정이 메말라가던 시기에 찾은 여성전용마사지는 마치 한 편의 시처럼
제 마음에 따뜻한 물결을 일으켜 주었어요.